How I Built a Secure, Parallel Video Transcoding Pipeline
1. What is Video Transcoding?
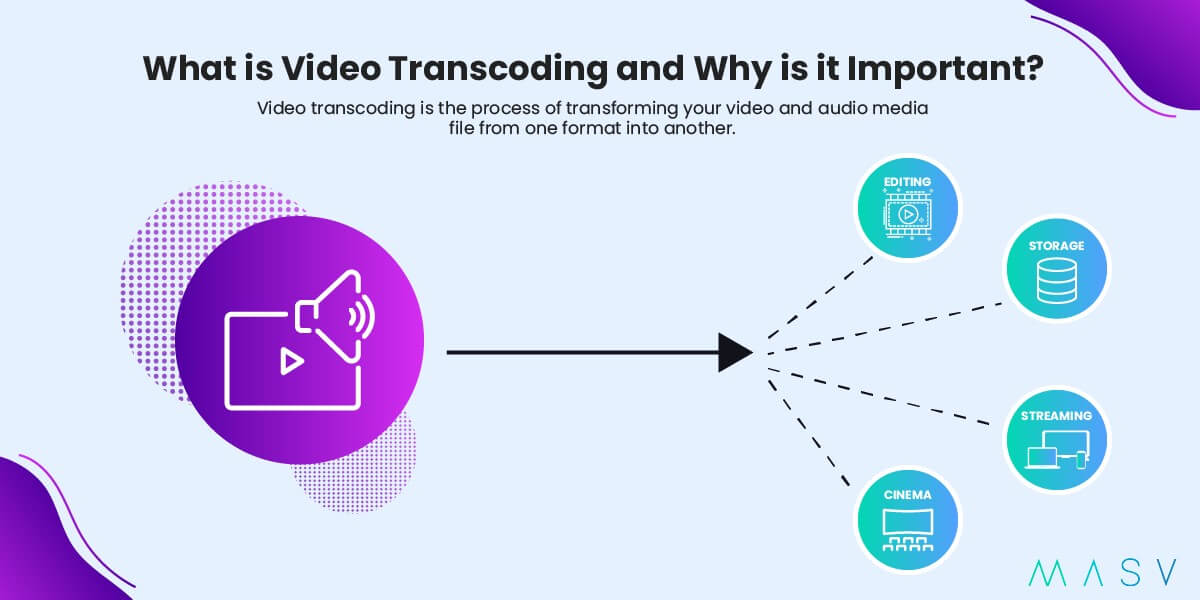
At its core, Video Transcoding is the process of converting a video file from one digital encoding format to another. It is the bridge between the raw, high-quality video file a user uploads and the optimized stream that actually plays on their device.
When a user records a video on a high-end camera or exports a project from editing software, the file is often massive. It may use a codec designed for editing (such as ProRes or DNxHD) or have a bitrate far too high for standard internet connections (e.g., 50 Mbps). If we streamed this raw file directly, a mobile user on 4G would face endless buffering, and our bandwidth costs would skyrocket.
Why is it Necessary?
Transcoding solves three critical problems:
- Compatibility: Not all browsers and devices support every video format. Transcoding ensures the video is converted into a widely supported standard, typically H.264 (AVC) or H.265 (HEVC), wrapped in an MP4 container.
- Compression: It reduces the file size significantly without destroying visual quality, making the video delivery over the internet feasible.
- Adaptive Bitrate Streaming (ABR): This is the most important aspect for modern streaming. Transcoding generates multiple versions of the same video at different quality levels (Renditions)
- 1080p (High Bitrate): For users with fast Wi-Fi and large screens.
- 720p (Medium Bitrate): A balance for standard laptops.
- 480p (Low Bitrate): For users on slower mobile data connections.
2. What is DRM (Digital Rights Management)?
While transcoding makes the video playable, DRM (Digital Rights Management) makes it secure. It is the technology that controls how digital content is accessed and prevents unauthorized redistribution—essentially, piracy protection.
If you simply host a standard .mp4 file on a server, anyone with the link can download it, copy it, and share it freely. For a platform hosting premium or exclusive content (like Netflix or Disney+), this is unacceptable.
How DRM Works
DRM isn't just about hiding the file; it’s about encryption.
- Encryption: During the transcoding process, the video file is scrambled using a secret cryptographic key. The resulting file is unwatchable garbage without the key.
- Licensing: When a user presses "Play", the video player (the browser) sends a request to a License Server.
- Decryption: The server verifies the user (e.g., "Is this user logged in?", "Did they pay for this movie?"). If authorized, the server sends a decryption key back to the browser.
- Playback: The browser uses this key to unscramble the video frames in real-time, purely for playback. The user never gets access to the raw file or the key itself.
Here are the revised sections. I’ve generalized the tools to focus on the architecture patterns (Queue, Worker, Object Storage) rather than just the specific libraries, while still keeping the code as a concrete example of how we implemented it.
3. The Tech Stack: Anatomy of a Video Pipeline
To build a pipeline that is both fast and secure, you need a specific set of components. While we used specific tools for our implementation, the architecture is universal.
- The Backend (e.g., Node.js, Java, Go): You need a robust server-side language to handle API requests and orchestrate the flow. We utilized NestJS (Node.js) for its scalable architecture, but this could easily be Spring Boot or Go.
- The Message Queue (e.g., BullMQ, RabbitMQ, Kafka): This is the buffer between the user's upload and the heavy processing. We chose Redis + BullMQ for its simplicity and speed, but any enterprise message broker works to prevent traffic spikes from crashing the server.
- Hardware Acceleration (e.g., NVIDIA T4, A10G): CPU transcoding is dead for high-scale applications. You need a GPU with dedicated NVENC (Encoder) and NVDEC (Decoder) chips. We deployed on NVIDIA Tesla T4 nodes, which offer the best price-to-performance ratio for video inference.
- FFmpeg: The industry standard for video manipulation. Crucially, we use a custom build compiled with NVIDIA CUDA support (h264_nvenc) to unlock the GPU's power.
- The Orchestrator Script (e.g., PowerShell, Bash, Python): You need a glue language to manage the FFmpeg processes. While many use Python or Bash, we used PowerShell Core to handle parallel execution logic and error handling natively.
- Shaka Packager: The gold standard for media packaging. It applies the DRM encryption (Widevine, PlayReady, FairPlay) and generates the streaming manifests (.mpd, .m3u8).
- Object Storage (e.g., S3, GCS, Azure Blob): A distributed storage system is essential. We use Google Cloud Storage (GCS) to hold both the raw "staging" files and the final encrypted assets, but AWS S3 or MinIO would work just as well.
4. How the Process Starts: The Upload & The Queue
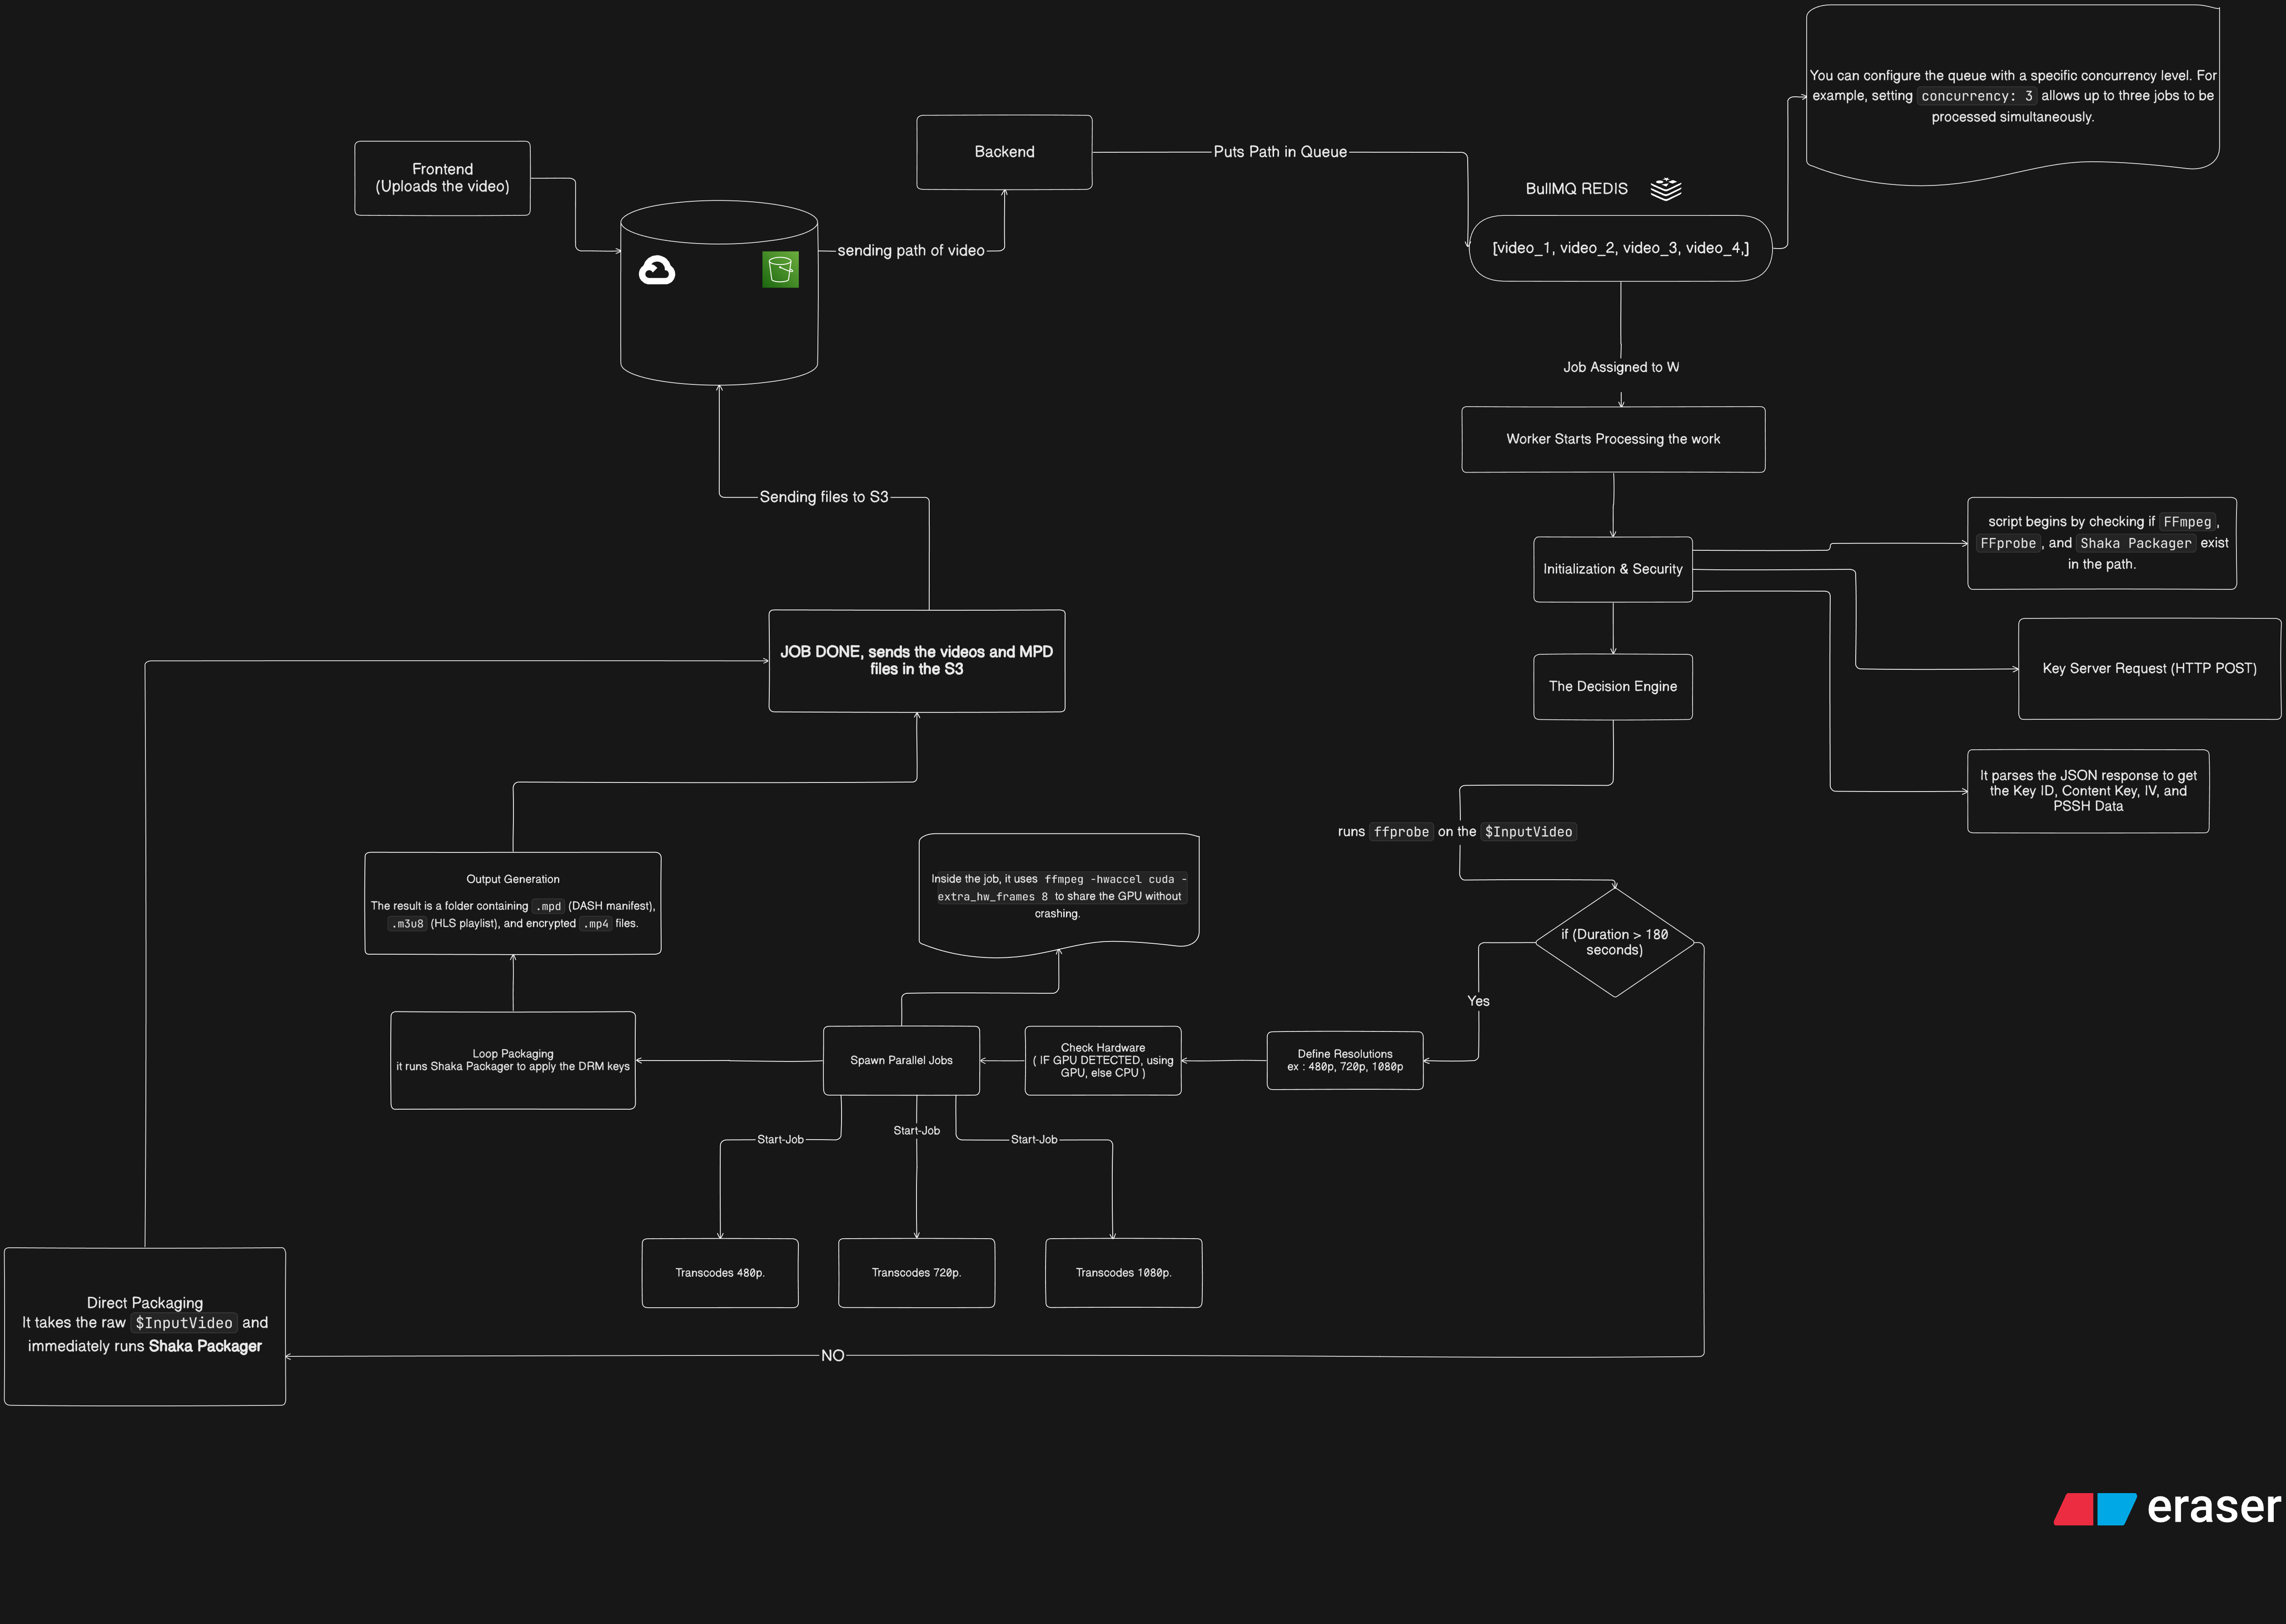
The lifecycle of a video in our system begins with a Chunked Upload. Since video files can be massive (often gigabytes in size), we never upload them in a single HTTP request. The client sends the file in small chunks, and the backend reassembles them.
Once the file is fully reassembled on the API server, we hit our first distributed systems challenge: The "Split-Brain" Issue.
The Problem
In a modern microservices environment (like Kubernetes), the API Service (which received the file) and the Worker Service (which will process it) run on different servers or pods. The Worker cannot see the file saved on the API's local disk. If the worker tries to process the job, it will fail because the file simply isn't there.
The Solution: Staging Strategy
Before we even tell the worker to start, the API acts as a bridge. It uploads the raw file to a temporary "Staging" bucket in our Object Storage (GCS/S3).
const stagingPath = `staging/${content.id}/${file.filename}`;
this.logger.log(`[Uploader] Uploading raw file to Object Storage: ${stagingPath}`);
await this.bucket.upload(file.path, { destination: stagingPath });
await unlinkAsync(file.path);
Adding to the Queue
Only after the file is safely in the cloud do we trigger the job. We add a job to our Message Queue (BullMQ in our case). This is where we pass the metadata—file paths, content IDs, and configuration—that the worker will need to download and process the file.
await this.transcodeQueue.add('process-video-v1', {
    fileData: {
        filename: file.filename,
        originalname: file.originalname,
        size: file.size
    },
    folderPath,
    contentId: content.id,
    gcsStagingPath: stagingPath,
});
console.log(`[Queue] Video ${file.filename} added to transcoding queue.`);
Here are the next two sections of the blog post, detailing the queuing logic and the hardware acceleration.
5. How Concurrency Helped: The Traffic Cop
The biggest danger in any video platform is the "Thundering Herd" problem. If your marketing team sends a push notification and 5,000 users upload videos at once, your servers will melt.
This is where Concurrency Control saves the day.
6. The Hardware: NVIDIA T4 GPU
Software transcoding (using the CPU) is the bottleneck of most video platforms. A standard 8-core CPU can choke on a single 4K video stream, leaving no resources for your API or database connections.
To solve this, we deployed the worker on a node equipped with an NVIDIA Tesla T4 GPU.
Not Just a Graphics Card
The T4 isn't just for gaming or rendering; it is a data center workhorse designed for AI inference and video processing. Its secret weapon is its dedicated hardware blocks:
- NVDEC (NVIDIA Decoder): A physical chip on the card dedicated solely to reading and decompressing the input video file.
- NVENC (NVIDIA Encoder): A physical chip dedicated solely to writing and compressing the output video.
The Offload Architecture
By using these chips, we completely bypass the system's main CPU.
- CPU Role: Handles network I/O, downloads the file, and runs the Node.js event loop.
- GPU Role: Handles the heavy floating-point math of video compression.
7. How the Script Works: Parallel Orchestration
The worker doesn't just run a single command; it executes a sophisticated PowerShell script that acts as an orchestrator. This script makes intelligent decisions based on the input file.
The "Smart Fork" Logic
Before processing, the script runs ffprobe to check the video's duration.
- Short Videos (< 3 mins): We skip the heavy transcoding queue entirely. The script sends these directly to the packager. This is our "Fast Lane" for quick clips.
- Long Videos (> 3 mins): These enter the "Heavy Duty" parallel processing mode.
Parallel Execution with PowerShell Jobs
Standard FFmpeg scripts are sequential: they process 1080p, wait for it to finish, then start 720p. This leaves the GPU idle during gaps and doubles the total processing time.
We utilized PowerShell Background Jobs to run all resolutions at the exact same time.
# Spawning 3 simultaneous GPU tasks
$Jobs = @()
$Jobs += Start-Job -ScriptBlock { FFmpeg-Command -Res 1080p ... }
$Jobs += Start-Job -ScriptBlock { FFmpeg-Command -Res 720p ... }
$Jobs += Start-Job -ScriptBlock { FFmpeg-Command -Res 480p ... }


# Wait for the slowest job to finish
Wait-AndStreamLogs $Jobs
Tuning FFmpeg: The P-Presets
Using the hardware encoder (h264_nvenc) isn't enough; you have to tune it. NVIDIA provides 7 specific "Presets" that trade off speed for quality:
- P1 (Fastest): Extremely fast, but lower visual quality and larger file size.
- P7 (Slowest): Highest quality, best compression, but takes significantly longer.
We benchmarked our specific workload and found the P4 Preset to be the perfect "Goldilocks" zone. It offers excellent visual fidelity for streaming while still encoding at 300+ FPS.
8. Sharing the GPU & "Zero-Copy" Data Flow
The biggest bottleneck in GPU computing is usually Data Transfer. Moving gigabytes of video frames from the System RAM (CPU) to the Video RAM (GPU) over the PCIe bus is slow.
The "Zero-Copy" Architecture
To maximize throughput, we implemented a Zero-Copy pipeline. This means once the video data enters the GPU, it stays there until the final frame is encoded.
We achieve this with specific FFmpeg flags:
1. -hwaccel cuda: Loads the compressed video directly into GPU memory.
2. scale_cuda: Resizes the video (e.g., 1080p to 720p) using CUDA cores inside the GPU.
3. -c:v h264_nvenc: Encodes the output using the NVENC chip.
Because we never copy the uncompressed frames back to the CPU RAM, we avoid the PCIe bottleneck entirely.
The "Decoder Surfaces" Crash
Running 3 high-speed streams on one GPU introduced a critical bug. We started seeing the error: No decoder surfaces left.
The T4 GPU has a limited number of "surfaces" (memory buffers) for decoding video. When 3 jobs tried to grab them all at once, they exhausted the pool.
The Fix: We added the -extra_hw_frames 8 flag to every command.
Bash
ffmpeg -y -hwaccel cuda -hwaccel_output_format cuda -extra_hw_frames 8 ...
This forces FFmpeg to allocate a specific, smaller number of surfaces for each job. It allows the GPU to context-switch between the 480p, 720p, and 1080p streams seamlessly without crashing, keeping our pipeline stable even under heavy load.
9. Shaka Packager: The Security Layer
Speed is meaningless if the content isn't secure. We couldn't just serve raw .mp4 files to the user; that would allow anyone to download and pirate our content. To prevent this, we integrated Shaka Packager, a media packaging SDK developed by Google.
How It Works
Shaka Packager acts as the final assembly line. It takes our transcoded video streams (the raw video and audio) and wraps them into adaptive bitrate streaming formats: DASH (for Android/Chrome) and HLS (for iOS/Safari).
Crucially, it applies DRM (Digital Rights Management) encryption during this packaging process.
- Key Retrieval: Before packaging begins, the script makes an HTTP POST request to our Key Server. It authenticates the video ID and receives a set of encryption keys (Key ID + Content Key) for Widevine and PlayReady.
- Encryption: Shaka Packager uses these keys to scramble the video frames. The output is a set of encrypted .mp4 files that are unwatchable without a license.
- Manifest Generation: It generates the .mpd and .m3u8 manifest files. These files act as a "map" for the video player, telling it which encryption system to use and where to find the video segments.
packager in=input_video.mp4,stream=video,output=encrypted_video.mp4 `
     in=input_audio.mp4,stream=audio,output=encrypted_audio.mp4 `
     --enable_raw_key_encryption `
     --keys=key_id=<KEY_ID>:key=<CONTENT_KEY> `
     --protection_systems=Widevine,PlayReady,FairPlay `
     --mpd_output=manifest.mpd `
     --hls_master_playlist_output=master.m3u8
10. Final Storage: Object Storage (S3 / GCS)
Once the packaging is complete, we are left with a directory full of secure, optimized assets. But these files are still sitting on the ephemeral disk of our Worker Pod. If the pod restarts, the data is lost.
The Upload & Cleanup
The final step of the pipeline is persistence. The script uploads the entire output folder—containing the manifests and the encrypted video segments—to our Object Storage (Google Cloud Storage or AWS S3).
We use a standard bucket structure to keep things organized: s3://my-video-bucket/videos/{content_id}/{resolution}/
The "Final Scrub"
Cloud storage costs money, and so does disk space. Once the upload is confirmed successful, the worker performs a strict cleanup routine:
- Deletes the local raw file: The massive source file is removed to free up space for the next job.
- Deletes the transcoded artifacts: The temporary folder is wiped clean.
- Deletes the Staging file: We trigger a delete command to the "Staging" bucket to remove the raw upload, ensuring we aren't paying for storage we no longer need.
Conclusion
Building a video platform is a journey of uncovering bottlenecks. We started with a monolithic Node.js server that crashed under the load of a single upload. By dissecting the problem, we evolved it into a distributed, event-driven architecture.
We learned that:
- Queues are mandatory: Redis BullMQ acted as the shock absorber that saved our API from traffic spikes.
- Hardware matters: Moving to NVIDIA T4 GPUs turned hours of processing into minutes.
- Parallelism wins: Orchestrating FFmpeg with PowerShell allowed us to utilize 100% of that hardware capability.
- Security is a process: Shaka Packager ensured our speed didn't come at the cost of content protection.
The result is a pipeline that is robust, scalable, and secure—capable of handling the demands of a modern streaming service.